I love these printable journal papers from Tsunami Rose Designs.
They make it so easy to design beautiful projects with little or not effort.
The colors are amazing.
I chose the blue/tan color combination from the set for my inspiration project for you this month. I hope you enjoy the creation and will follow along to see my photo tutorial of the creative process.
I started by cutting out my choice of papers and gathering embellishments from my studio stash.
The card base was cut at 12" x 7" and scored at 2" and again at 5"
Begin by cutting the designer papers to fit each individual section (being backed by tan card stock).
Deciding on which trims to add
Decisions - decisions (I have some antique crocheted trim which I really wanted to use in this card, but unfortunately, it just didnt work for it.

Copper ribbon from my stash was attached with 1/8" score tape around the entire front and back of the card.
Tan card stock was cut at 6 1/4" x 4 3/4" and attached with an ATG.
The inside panel was also "lined" with the tan card stock.
The top layer of the inside panel was cut to size, distressed and a layer of antiqued white lace was added to the underside with the ATG.
Close up of lace.
The snowflakes were cut out with small, medium and large The Paper Studios punches, dipped in tacky glue and glittered with both Recollections tinsel glitter and a mix of home made glitter using a couple of colors from my stash.
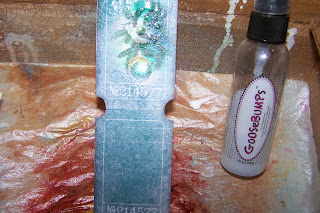
The front panel was distressed and sprayed with Goosebumps.
The ticket was sprayed with Goosebumps as well.
Close up of spraying station and Goosebumps spray.
The tan backing was stamped with Versamark Embossing Ink and heat embossed with Recollections Glitz Sparkle Embossing Powder.
Close up of heat embossing.
The flourishes on the sentiment block were outlined with the embossing pen and heat embossed with the same Glitz Powder
and then the edges of the sentiment were lightly brushed with tacky glue and dipped in Recollections Tinsle Glitz.
The die cut leaves (Spellbinders Pointsettia set) are distressed with Vintage Photo Ink from Tim Holtz
The sentiment block was backed with tan cardstock to fit and attached to the card front wth foam tape.
Start adding your leaves and embellishments where you would like them, attach with either micro dots or foam tape depending on the need.
Fussy cut envelope and tags, tape and embellish to your liking.
Make the "pocket" by taping the 2" fold (top and bottoms only)
Attach the ticket with ATG
Finish by placing premade flowers and home made embellishments
(in this case my home made stick pins)
You can find all the information to purchase this journal kit by clicking on the links below.
Tsunami Rose Designs Links


No comments:
Post a Comment